Android Recycle Bin: Find and Recover Deleted Files on Android Phone
The recycle bin on the computer allows us to recover deleted files with one click after accidentally deleting them. When people use smart phones, they also hope that there is a recycle bin or trash folder on the phone, so that they can restore the deleted data with one click when they encounter accidental deletion of important files on the Android phone.
However, the features and settings of smartphones and computers are different, and there is no such recycle bin that can store all deleted files on Android phones. Android phones have limited storage space, and deleted data in Android will be overwritten and erased by newly created data. Therefore, you cannot undelete data from the recycle bin on Android. The deleted files on your Android device actually still have a chance to be recovered directly from the device, just like a recycle bin to find your lost data. Of course, you cannot directly enter and view the lost data, unless you use the help of third-party software - Android Data Recovery.
Part 1. How to access the recycle bin on an Android phone
1. Android Email Recycle Bin: All email clients, including Gmail, Outlook and Yahoo have their own trash folder, which can temporarily save deleted emails. You can open the email application on your phone and find the trash folder to access the deleted emails.
2. Trash can on photo apps: Some photo apps like Google Photos have a built-in trash folder for you to view the deleted data.
3. Recycle Bin in File Explorer: File Explorer applications such as Dropbox and ES File Explorer include their own recycle bin, and you can view the deleted data in the recycle bin.
Part 2. How to Recover Deleted Files on Android?
In fact, not all deleted files in your Android phone can be scanned and restored from your Android phone. The deleted data will still be stored in the device until it is completely overwritten and erased by new data. Once you find that you have accidentally deleted important data, immediately stop using your phone and use Android Data Recovery app to scan your device, which can increase your chances of recovering data. Professional Android Data Recovery tools allow you to easily retrieve photos, videos, text messages, app data and more. Let's see features about Android data recovery software.
- Android Data Recovery: Safely recover deleted data from Android phone and tablet.
- Safely recover deleted data from Android phone and tablet after accident deletion, factory reset, white screen, black screen.
- Recover data from Android phone with cracked screen, fix damaged, frozen, crashed, broken, non-responding Samsung phone to normal.
- Selectively and flexible backup and restore Android Data in one-click.
- Preview before recovery and selectively restore Android data.
Step 1. Download and Launch Android Data Recovery
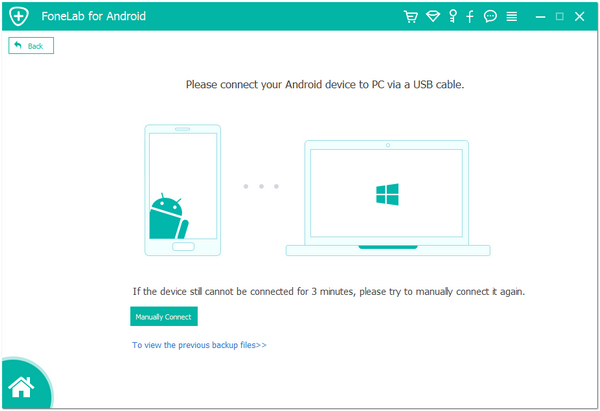
Click on the download button and install the trial version of Android Data Recovery for free. It is fully compatible with both Windows and Mac. Then connect your Android to computer with a USB cable.
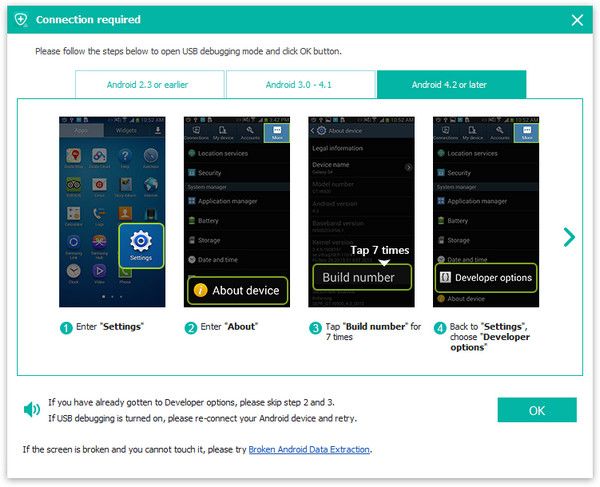
Step 2. Authorize and Enable USB Debugging
When authorization is required in the pop-up window of the Android phone, click "OK". If the pop-up window does appear, you can manually enable USB debugging on your phone.
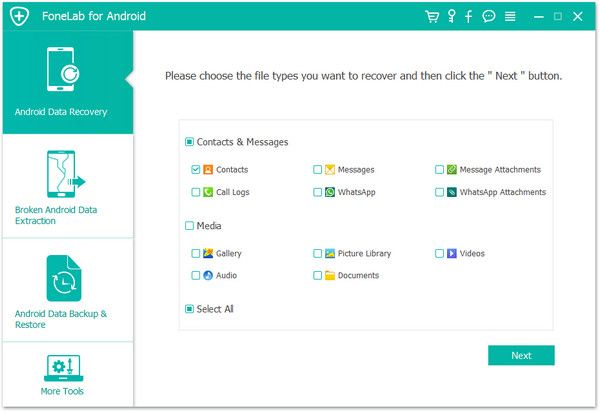
Step 3. Choose File Types to Recover
After the Android phone is successfully connected to Android Data Recovery, you can freely select the file type you need, you can select specific files or all. After that, click the "Next" button to continue to the next step.
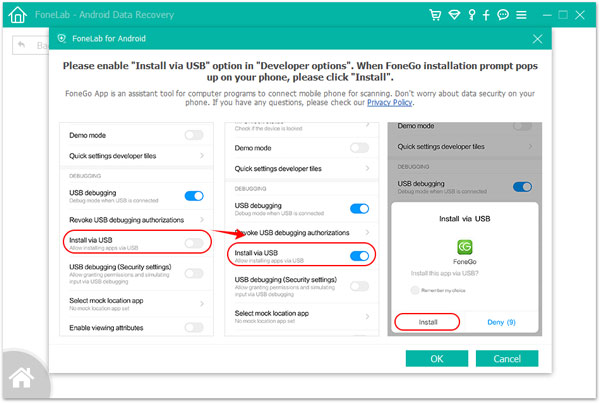
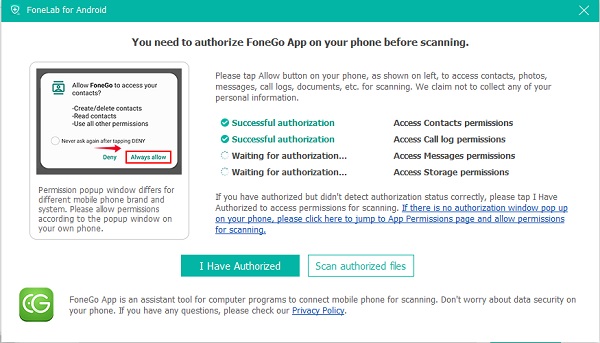
Step 4. Grant Permission to Scan Android
Before scanning the deleted files on the phone, the program needs your permission to access the device. To obtain permission, it will install the Rooting Tool - FoneGo application on your phone. Follow the tips to enable "Install via USB" option in "Developer options".
After completing the installation and authorization, according to the request of the desktop program, click Allow to access your deleted data, including contacts, photos, text messages and more. If you have authorized but the program didn't detect authorization status correctly, please click "I Have Authorized".
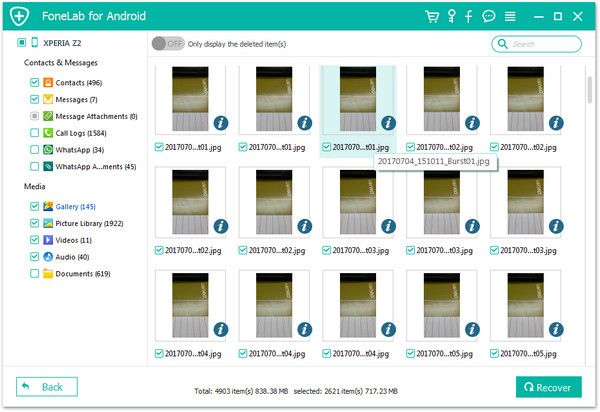
Step 5. Recover Android Data
After you finish the above steps, the software will start scanning process, it will use "Standard Scan" mode for the process, it will show deleted and non-deleted files on the phone storage. When the scanning is over, you can click "OK" and all data type will list in categories on the program's interface, click one category you need and preview related data on the right side, check if the deleted files display on the screen when using the standard scan mode. If you can't find the deleted data, you can click "Deep Scan" to access mode erased files, else you can tick the checkbox to select target data, click "Recover" button to restore chosen files.
Part 3. Where Are Deleted Files Stored on Android Phone?
Now we know that Android phones have no recycle bin, so where will the deleted data be stored? Actual, the deleted data stays where it is, and it won’t go anywhere. This is why we can recover deleted data. But some operations will cause the deleted data to be overwritten, such as installing apps, sending messages, taking photos, so we need to restore them as soon as possible when you find the data is missing.
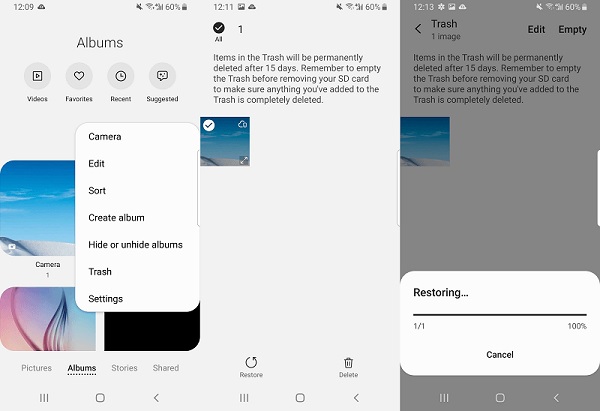
For deleted photos and videos, many Android phone manufacturers set an trash to recycle these deleted pictures, and you need to know, the deleted data will be stored on trash for 15 days, you can follow the below steps to get back photos or videos within 15 days, here we take Samsung as example.
1. Unlock the phone and tap "Gallery" on the home screen.
2. Click on the three dots in the upper right corner.
3. There are many options list in order, tap on "Trash".
4. Check out all photos or videos you want to restore and press "Restore" button to get them back.
Part 4. How to Back Up Android Data for Free
In order to avoid data loss, you had better sync Android data to Cloud Server or computer, here we introduce the Android Recovery tool for you to back up Android data to PC for free, follow the below steps.
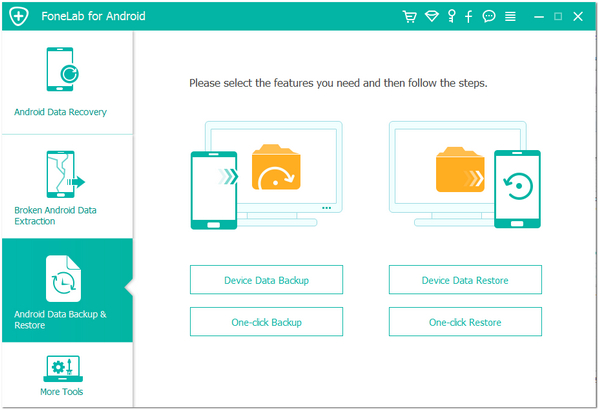
Step 1. Launch the Android data recovery software on computer after you install it, you will see the homepage, tap on the feature of "Android Data Backup & Restore". Link your Android phone to the software with a usb cable, you will see a pop-up on phone screen, tap it and the software will prompt you to enable usb debugging, after turn usb debugging on, the software will detect your phone.
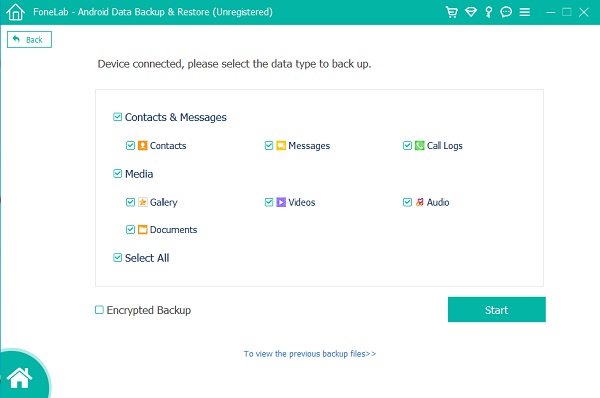
Step 2. In the interface, choose "Device Data Backup" or "One-click Backup" option. If you choose "One-click Backup" option, you can choose a target folder to back up all Android data, including photos, videos, contacts, audios, call logs and more. If you choose "Device Data Backup", you need to select data type to backup, if you want to set a password for backup, you can tick checkbox "Encrypted backup", click "Next" and enter the password on the pop-up.
Step 3. Now the software will install FoneGo App on your phone, you need to authorize FoneGo App on your phone before scanning, please tap "Allow" button on your phone, as shown on left, to access contacts, photos, messages, call logs, documents, etc... for scanning. We claim not to collect any of your personal information. After that, you can tap "I Have Authorized".
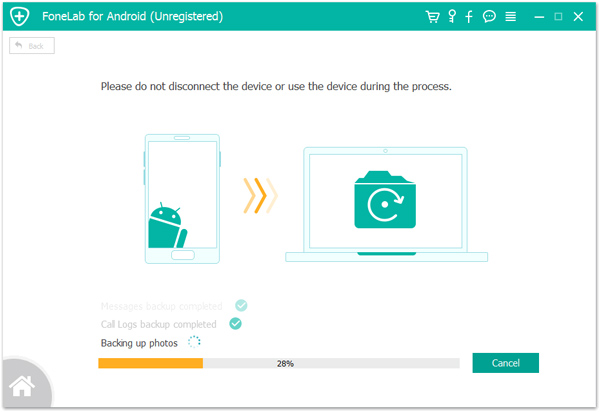
Step 4. After you finish above steps, you can choose a destination folder and start back up Android data to computer for free.